Microtuber based seed production system
-
Microtuber based seed production system
-
Microtuber production.
- Test the microplants for virus freedom before initiating microtuber production.
- Mass multiply virus-free stock plants through nodal cuttings on semisolid MS medium in culture tubes (25 x 150 mm) following the standard procedure upto 10-12 cycles as discussed earlier.
- Transfer 3-4 weeks old microplant shoot cuttings (3 to 4 node segments) into 250 ml conical/erlenmeyer flasks or culture bottles containing 25-35 ml liquid medium (propagation medium without agar).
- Incubate the culture tubes at 250C and 16 hr photo period (120-200 μmol/m2/s-1) in the culture room.
- After 3-4 weeks of incubation, decant the unutilized liquid propagation medium from the conical/erlenmeyer flask or culture bottle under aseptic conditions and pour 40 ml of microtuber induction medium.
- The microtuber induction medium is based on MS basal media supplemented with 10 mgl-1 N6-benzyladenine purine (BAP) and 80 gl-1 sucrose/commercial sugar.
- After adding induction medium, incubate the cultures under complete dark condition at 15 ˚C for 60 to 90 days depending on the genotype.
- Microtubers develop epigeally at the apical as well as axillary buds of the shoots. In general, 15 to 20 microtubers weighing 50-300 mg are produced in each flask/culture bottles.
- Before harvesting, green the microtubers in the culture room by incubating microtuber induced cultures under 16 h photoperiod (approximately 30 μmol m-2 s-1 light intensity) at 22- 24˚C for 10 to 15 days.
- Carefully remove the cultures along with microtubers from conical/erlenmeyer flasks or culture bottles and manually harvest the green microtubers.
- Avoid damaging the microtubers, especially the thin periderm during harvest.
- Wash and treat the harvested microtubers with 0.1 per cent carbendazim for 10 minutes, and allow it to dry in the dark at 20 0C for 2 days.
- Pack the treated microtubers in perforated polythene covers and store in a refrigerator for 4-5 months untill planting for breaking the dormancy.
- Take out the microtubers from the refrigerator 15-20 days before planting.
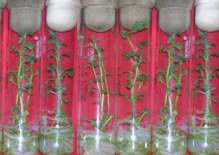
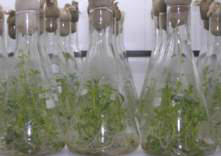

Micropropagation Culturing in liquid medium Microtuber induction
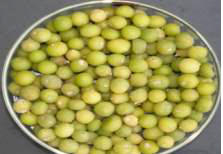


Microtubers Minituber production Minitubers
-
Minituber production
-
a. Planting of microtubers
-
Take out the stored microtubers and keep them in the ventilated conditions under diffused light for sprouting.
-
Plant the sprouted microtubers in the nursery beds in mixture of soil, sand and FYM (2:1:1) in rows at 30 x 10 cm spacing in the well preapared net/ polyhouse beds as described for planting of microplants.
-
-
b. Fertilizer application, seed health management, harvest and post harvest handling
-
I. Planting of hardened microplants
- The hardened plantlets should be removed from protrays along with peat moss and transplanted in nursery beds in rows at 30 x10 cm spacing under insect proof net/ polyhouse condition.
- For those plantlets hardened in the same growth containers under ambient conditions, take out the plantlets from the test tube, wash the adhering growth medium, trim the long adventious roots using scissor or cut the medium level and plant at same geometry as described above for protray hardened plantlets.
- A light irrigation before and after planting should be provided and thereafter irrigate twice a day or as per the requirement.
-
II. Seed health management
- Test 5% of the plants by ELISA.
- Rogue out all virus infected plants if any, and also off-type plants observed during inspection.
- Follow recommended plant protection schedule. As a prophylactic measure, one or two spays of systemic insecticide like imidacloprid @3 ml/litre water should be given.
- The seed tubers thus produced are called minitubers.
-
III. Harvest and post harvest handling
- Allow the microplant crop to mature and harvest the minitubers.
- Cut the haulms upon maturity and harvest the minitubers 15 to 20 days after haulms killing when the tuber skin is hardened.
- Curing is done by keeping the seed tubers in heap for about 15 to 20 days in a cool shady place.
- Each microplant shall yield 6-8 minitubers or more depending upon the cultivar.
- After curing, the minitubers should be graded into >3 g and <3g.
- Treat the mini-tubers with 3 per cent boric acid (commercial grade) solution for 25 minutes to prevent surface borne diseases.
- Minitubers harvested from microplants (Generation-0) are called as nucleus seed.
- Store the minitubers in country store in hills while in cold store at 3-4ºC in the plains.
- Minitubers weighing >3 g will be planted in Generation-l in the field during next season. Whereas, <3 g minitubers may be recycled once again in Generation-0 under controlled poly/net house conditions. If the crop meets the G-0 criteria, i.e. if the stocks are free from viruses during testing of randomly tested 5% plants, the produce can be used for raising G-1 crop in the field next season.
-