Conventional seed production system
-
Conventional seed production system
-
Development of nucleus seed
The nucleus seed is produced in the hills and plains, where growing conditions are favourable. In hills, it is produced during long day conditions whereas, in the plains it is grown during short day conditions of winter. In the conventional seed production system, the nucleus seed can be developed through clonal selection and tuber indexing.
- Tuber indexing
Hill tubers are indexed in the plains in winter in one or two shifts i.e. one from November to January and another from January to March as the environmental conditions are favourable in plains than in hills.
During winter, indexing can also be done in the hills under controlled conditions in the glass/ poly house.
In the plains, tubers are indexed at the station itself after dormancy breaking from February to April through leaf ELISA or in September by sprout ELISA.
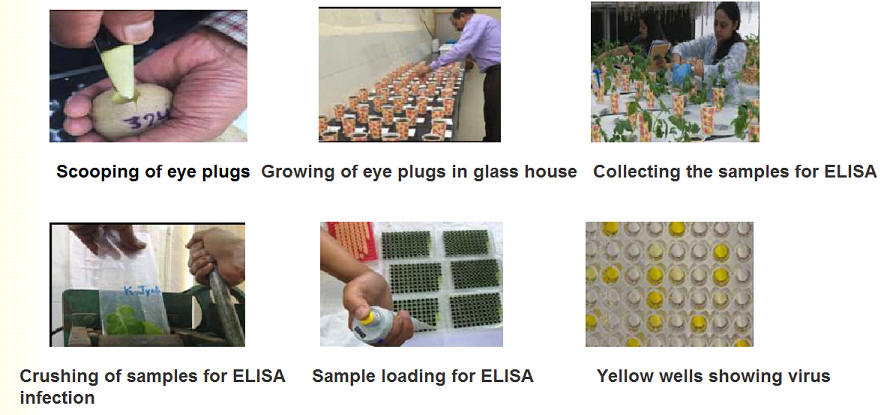
It is a process of testing the selected tubers for virus freedom by growing their eye plugs under net house. At Central Potato Research Institute, clonal selection is done (from stage-I) both in hills as well as in plains.
The schedule of tuber indexing is as under:
-
Development of nucleus seed
- Preparation of tubers for indexing
- a.Scooping of eye plugs
-
Scoop an eye plug next to the crown end from each of four selected tubers of each clone (1 cm dia and 1.5 cm length) with a specially designed knife and retain the counterpart tubers in a group separately.
-
Sterilize the knife with spirit after scooping each eye to avoid transmission of viruses and bacteria to other healthy tubers/clones.
-
Treat the scooped dormant eye plugs clone-wise with 1 ppm GA3, 1 per cent thiourea and 0.2 per cent mancozeb solution for 1 h.
-
Suberise the eye plugs in shade and bag all the four eye plugs of each clone in 10 x 5 cm perforated polythene bag along with label.
- b. Storage of counterpart tubers
-
Dust the eye hole of counterpart tubers with dry cement or ash + mancozeb mixture to avoid microbial infection.
-
Keep four tubers of one clone in 1 kg capacity perforated polythene bag or arrange serially in wooden/plastic crates and store in country stores in the hills from November to March and in cold stores in the plains from March to September.
- c. Planting and testing of single eye plugs
-
Fill the pots (4” dia. earthen/plastic) with sterilized soil plus FYM mixture (1:1). arrange them serially in a group of four pots in the net/ glass house and plant the one eye plug per pot without damaging the sprout.
-
After planting the eye plugs water them immediately, thereafter on alternate days as per the requirement.
-
The ideal temperature for plant growth and virus multiplication is 20-250C.
-
Test the plants for virus freedom by ELISA after 6 to 7 weeks of planting or at 6 to 8 leaf stage as per the procedure.
-
Even if any plant out of four eye plugs in a clone is found infected with virus during testing, all the counterpart indexed as well as their un-indexed sister counterpart tubers are to be rejected.
- Nucleus seed production
-
Planting method and spacing
The virus free indexed tubers obtained during ELISA are used for further field multiplication.
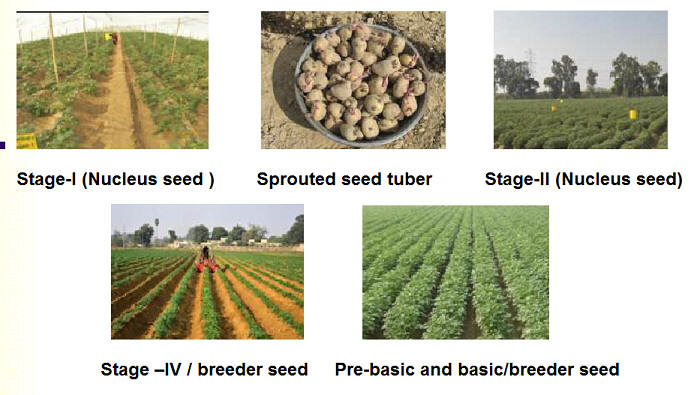
The disease free indexed counterpart tubers are planted in stage-I at a spacing of 1 x 1 m in hills and 1.2 x 1.2 m in the plains.16
The counterpart clones of indexed tubers as well as other clones from the produce of last year's stage-I are to be planted in stage-II at a spacing of 1 x 0.2 m in hills and 1.2 x 0.2 m in the plains.
Planting of stage-I in plains can be done manually or mechanically whereas in hills it will be done manually.
Place the tubers deep if soil is dry and shallow if the moisture is more, cover the tuber with the loose soil to a height of 15 cm and make a ridge.
The produce of single plant of stage-I should be planted clone wise in stage-II.
The crown end of the tuber should face upward while planting manually.
- Field testing of seed crop
-
In stage-I, 100% plants should be tested by ELISA against PVX, PVS, PVY, PVM, PVA and PLRV. Therefore, leaves from all the four plants of each clone should be collected together in order to get composite sample.
-
Whereas, in stage-II only 5% clones are to be tested by ELISA.
-
Rogue out all virus infected plants confirmed during ELISA testing and also diseased as well as off-type plants observed during field inspections. The seed produced in these stages (Stage-I & II) is called nucleus seed.
- Field inspection and roguing
-
During seed production the quality of seed can be maintained
by roguing the off type as well as diseased plants. -
The plants infected with severe mosaic can be easily identified but it is difficult to identify the plants with mild mosaic symptoms. However, it can be identified by a person who is well trained in identification of virus symptoms.
-
Generally, roguing should be done in the morning hours form 10 to 11 AM after drying of dew and evening hours from 3 to 5 PM. Light intensity is to be taken into consideration for better identification of mild mosaic symptoms.
-
In addition to this the direction of movement of person involved in roguing is again important. The roguing person should always move in the direction of sunlight so that the shadow of his body will help him to judge and identify the diseased plants.
-
Rogue out the plants showing disease symptoms during inspection along with newly formed tubers if any.
-
Inspect the seed crop four times as per seed certification norms.
- Breeder seed production
-
Planting method and spacing
-
The produce of stage-II (nucleus seed) is multiplied as bulk in stage-III at a spacing of 60 x 20 cm. The produce of stage-III is called as pre-basic seed.
-
The produce of stage-III (pre-basic seed) is further multiplied in stage-IV during fourth year and the produce of stage-IV is called as breeder seed or basic seed.
-
-
Field testing of seed crop
In stage-III check testing of randomly selected 300 plants ha-1 is done by ELISA.
In Stage IV, randomly selected 150 plants ha-1 are check tested by ELISA.
Rogue out all the diseased as well as off-type plants observed during field inspection.
Follow other components of seed plot technique as per protocol.
-
Foundation
seed production (FS-I and FS-II)
The breeder seed produced by CPRI is v supplied to State Agriculture/Horticulture departments, National Seed Corporation (NSC) and State Farm Corporation of India (SFCI). It is further multiplied in Foundation Seed-I (FS-I) and Foundation Seed-II (FS-II) at the government/contract grower's farm by adopting seed plot technique and standard package of practices.
Foundation Seed-I is produced from v breeder seed while Foundation Seed-II is produced from Foundation Seed-I.
These classes of seeds are certified by the respective state certification agency.
-
Certified seed production
- Certified seed is produced by registered growers /farmers. It is the progeny of Foundation Seed-II.
- State Seed Certification Agency monitors the quality of these categories of seed. The certification system provides check on spread of diseases and pests.